ARDUINO NANO LED WARNING LIGHT WITH BUZZER 11 LED SEQUENCER

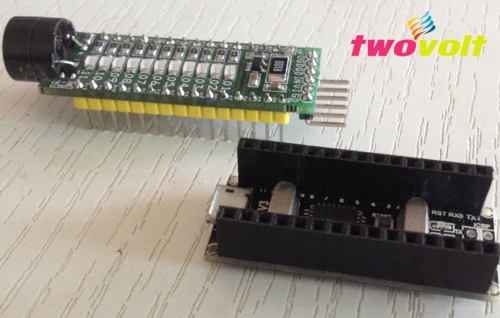
Project published here is simple 11 LED and Buzzer shield for Arduino Nano, shield can be used as bar-graph monitor, buzzer sound effects, the simple example code used to show warning LED including buzzer sound. Circuit works with 5V DC. Shield also provided current sensor circuit which is no use in this project can be abandon. All LEDs 1206 SMD, All resistor are 0805 SMD.
Light Effects and Sound Effects Arduino Nano shield, shield contains 11 LEDs ,one buzzer and INA198 current measurement , shield can be used to develop various projects like LED Bar-graph Volt Meter, Bar-Graph Current Meter, LED light effects, Warning light and sound.
Download Data Sheet INA198 Current Sensor
- Supply 5V DC
- 11 LEDS Connected to D2-D12 Digital Pins Of Arduino Nano
- Buzzer Connected to Digital Pin D13 to Arduino
Note : Don’t populate the parts shown in doted box, those parts can be used for current measurement.
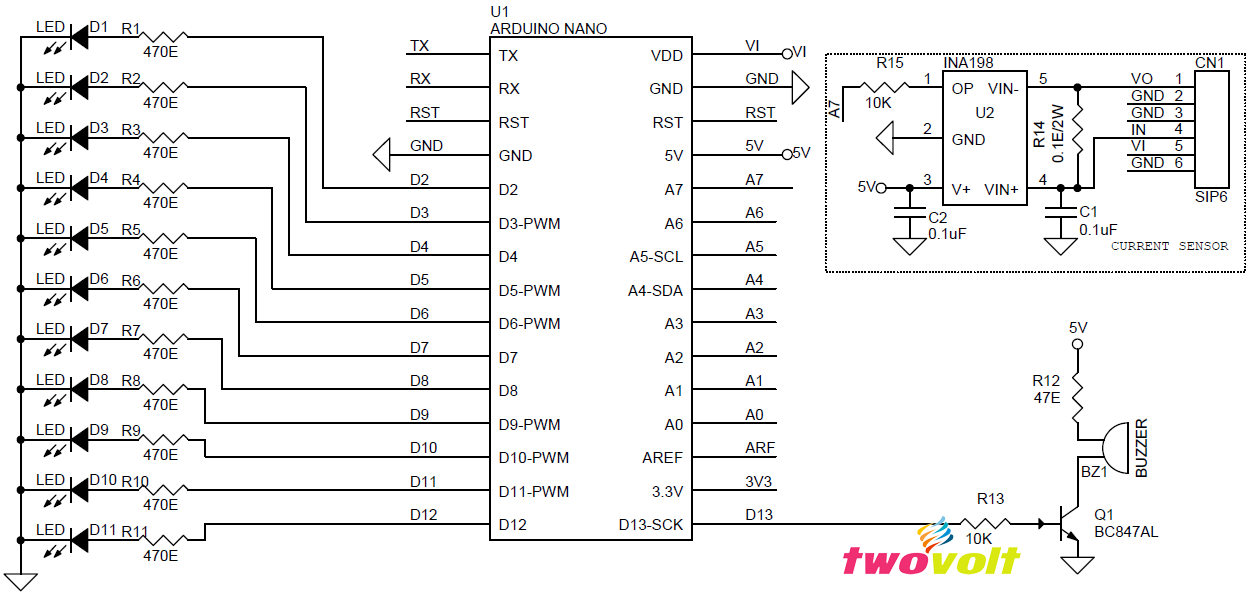
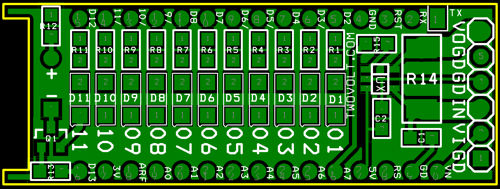
11 LED AND BUZZER ARDUINO SHIELD FOR NANO SCHEMATIC
11 LEDs and Buzzer Warning Light Arduino Code, 11 LED Sequencer Arduino Code
LEDs Connected to Pin D2-D12 and Buzzer Connected to D13
/* A simple program to sequentially turn on and turn off 11 LEDs and Sound Buzzer */
int LED1 = 13;
int LED2 = 12;
int LED3 = 11;
int LED4 = 10;
int LED5 = 9;
int LED6 = 8;
int LED7 = 7;
int LED8 = 6;
int LED9 = 5;
int LED10 = 4;
int LED11 = 3;
int LED12 = 2;
void setup() {
pinMode(LED1, OUTPUT);
pinMode(LED2, OUTPUT);
pinMode(LED3, OUTPUT);
pinMode(LED4, OUTPUT);
pinMode(LED5, OUTPUT);
pinMode(LED6, OUTPUT);
pinMode(LED7, OUTPUT);
pinMode(LED8, OUTPUT);
pinMode(LED9, OUTPUT);
pinMode(LED10, OUTPUT);
pinMode(LED11, OUTPUT);
pinMode(LED12, OUTPUT);
}
void loop() {
digitalWrite(LED1, HIGH);
delay(60);
digitalWrite(LED2, HIGH);
delay(60);
digitalWrite(LED3, HIGH);
delay(60);
digitalWrite(LED4, HIGH);
delay(60);
digitalWrite(LED5, HIGH);
delay(60);
digitalWrite(LED6, HIGH);
delay(60);
digitalWrite(LED7, HIGH);
delay(60);
digitalWrite(LED8, HIGH);
delay(60);
digitalWrite(LED9, HIGH);
delay(60);
digitalWrite(LED10, HIGH);
delay(60);
digitalWrite(LED11, HIGH);
delay(60);
digitalWrite(LED12, HIGH);
delay(60);
digitalWrite(LED1, LOW);
delay(60);
digitalWrite(LED2, LOW);
delay(60);
digitalWrite(LED3, LOW);
delay(60);
digitalWrite(LED4, LOW);
delay(60);
digitalWrite(LED5, LOW);
delay(60);
digitalWrite(LED6, LOW);
delay(60);
digitalWrite(LED7, LOW);
delay(60);
digitalWrite(LED8, LOW);
delay(60);
digitalWrite(LED9, LOW);
delay(60);
digitalWrite(LED10, LOW);
delay(60);
digitalWrite(LED11, LOW);
delay(60);
digitalWrite(LED12, LOW);
delay(60);
}